In this new Airless Q&A Video Series, we discuss HVLP gun cleaning, as insufficient cleaning and maintenance of HVLP guns is a common problem. Uncleaned paint residues can quickly lead to malfunctions. The cup can no longer be screwed on properly and sealed, because paint residues have dried on the thread. The paint channel is clogged with dried paint. The nozzle, needle or air cap can also stick to the paint and become unusable if not cleaned sufficiently. That’s why we show in the video, using a Graco Edge II Plus HVLP gun as an example, how cleaning and maintenance can be carried out thoroughly, without complication and without losing a lot of time.
Cleaning and maintenance of the HVLP gun
Below we provide step-by-step instructions for cleaning and maintaining HVLP guns. These instructions can be used for all common HVLP guns, regardless of the manufacturer (e.g. Wagner or Graco). In the video we are using a Graco Edge II Plus gun.
Release the pressure on the HVLP gun for safety
In order to safely clean the gun, the gun pressure must be released. To do this, the fan must first be switched off. For safety reasons, also disconnect the HVLP blower plug from the power supply. Disconnect the HVLP gun from the air hose and the air hose between the gun and the bucket.

Disconnect the air hose from the HVLP gun
Cleaning the HVLP gun cup
For cleaning, the cup is separated from the gun. To do this, simply unscrew the cup from the gun connector. The remaining varnishes/lacquers/paints must be removed from the cup and can be reused. For this purpose, it is best to pour the product back into the original container.

Separate the HVLP gun from the bucket
Replace the cup lining or clean it thoroughly for reuse. Also clean the lid, stem and strainer thoroughly.
Cleaning the air cap, needle & nozzle
To clean the air cap, needle, nozzle and gun body, simply remove the air cap. The nozzle can then be unscrewed. When doing so, hold the gun trigger in to avoid damaging the needle or nozzle.

Nozzle Removal – Graco HVLP Gun
With the nozzle, the spring is also removed and cleaned later. On the gun trigger, switch the safety catch to remove the needle.

Unlocking the needle safety
Clean all components thoroughly with a cloth, sponge or brush and dry them. Next, clean the paint channel in the gun. To do this, it is best to turn the gun upside down and hold the trigger down. Using a small plastic bottle, squeeze the cleaning fluid through the paint channel until everything is clean. Then dry the whole thing.

Plastic bottle for cleaning HVLP guns
In the video, we used a water-soluble paint, so we were able to clean with water. If you are using solvent-based varnishes and paints, cleaning should be done with a solvent first (recommended by the paint manufacturer for their product); then a quick rinse with water.
Assembly of the HVLP gun
After cleaning, simply assemble the gun in reverse order. Here too, care must be taken to ensure that the trigger of the gun is pulled when assembling the nozzle, to avoid scratching and damage to the nozzle and needle.
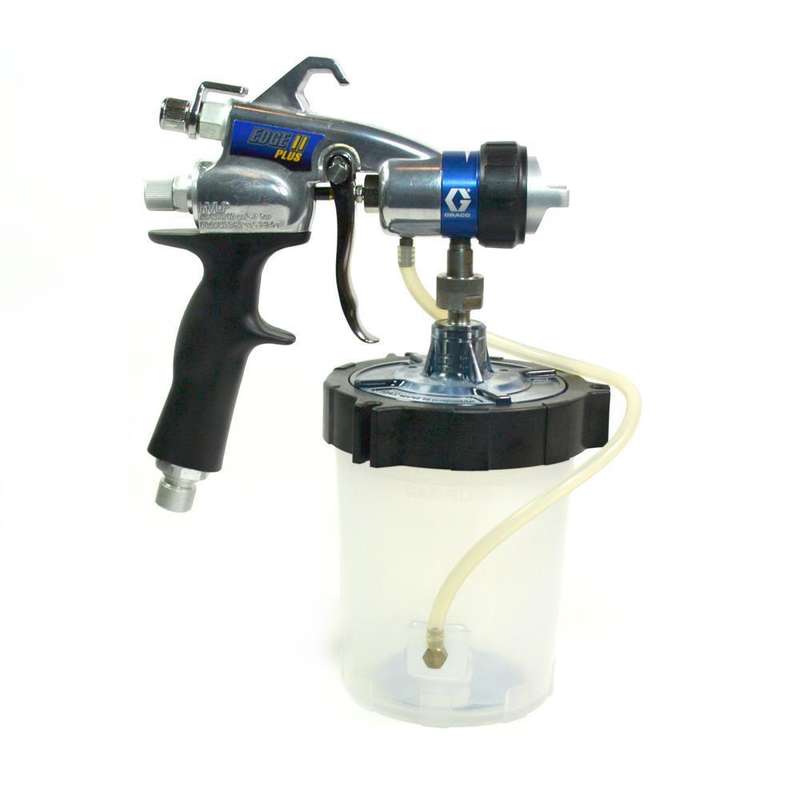
Graco Edge II Plus spray gun
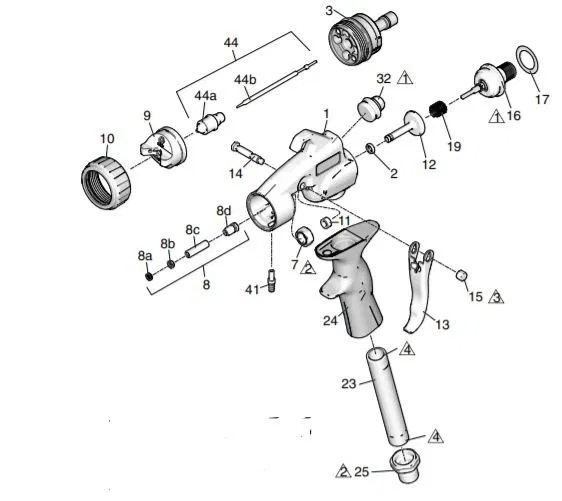
Spare parts for HVLP guns
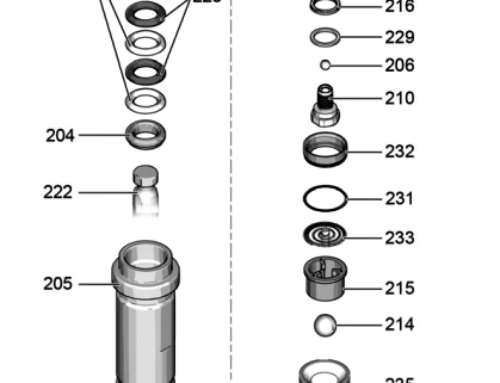
Careful cleaning and maintenance delays wear, but does not prevent it. Therefore, here are links to construction drawings and spare parts lists for the most common HVLP painters and spray guns.
(You can find the plans of the HVLPs at the bottom of these pages)